

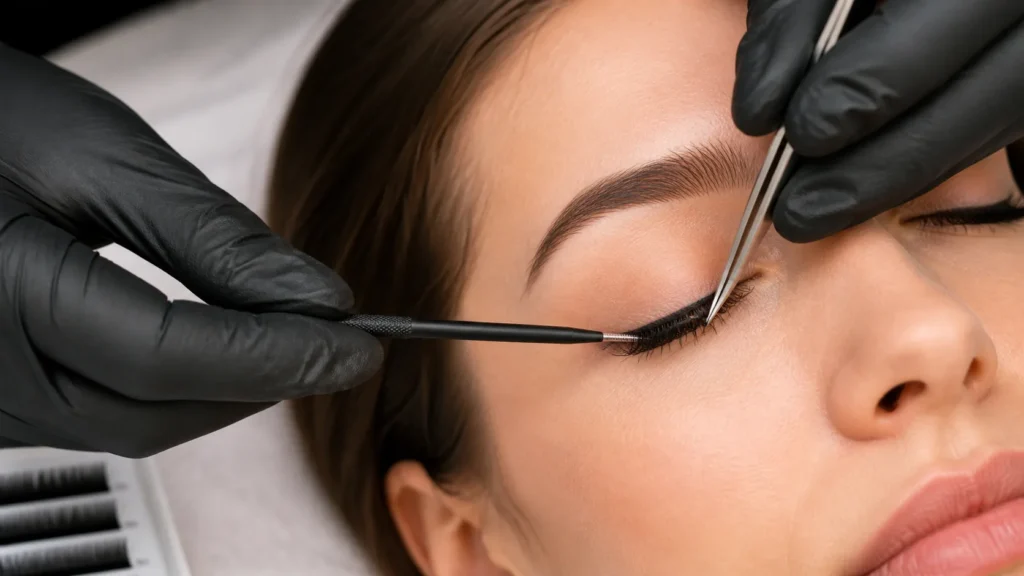
Assess the client’s eye shape before applying inner-corner lash extensions. Because the inner corner influences the balance of the entire lash set, adapt the lash map to the client’s features, natural lashes, and desired style instead of applying one universal pattern.
The term corner lashes can describe two different services or products. In this guide, it refers to individually applied inner-corner lash extensions. In consumer product or strip-lash contexts, corner lashes may instead mean half, 3/4, or strip lashes designed for the outer third of the eye, often to create an elongated look. Those products are distinct from the professional inner-corner extension workflow covered here.
Inner-corner extensions can add depth and dimension to a finished look, but the area requires careful isolation, lightweight materials, precise placement, and appropriate preparation. This guide outlines a professional workflow for trained lash artists: assess the eye shape, select suitable tools and materials, prepare the client, create a customized map, apply the extensions carefully, and evaluate common problems when retention or corner placement is inconsistent.
Professional and safety boundary: This procedure is intended for trained lash artists working within applicable hygiene, allergy-screening, adhesive-handling, and eye-safety practices. Follow the instructions for the products being used and stop the service if the client experiences significant discomfort, irritation, or an unexpected reaction.
1. Prepare for Inner-Corner Lash Extensions
Preparation affects comfort, control, adhesion, and the appearance of the completed set. Before beginning, assess the client’s eye shape and natural lashes, discuss the requested look, organize the workspace, and confirm that the selected materials are suitable for the service.
Assess the Eye Shape and Natural Lashes
Look at the eye shape, the direction of the natural lashes, the available space in the inner corner, and the strength and density of the natural lashes. These observations should guide the map and material selection. The same inner-corner length or progression may not suit every client.
The assessment should answer practical questions such as:
- How much visible space is available near the inner corner?
- Do the natural lashes point upward, downward, or toward the nose?
- Would additional length make the inner corner look heavy or crowded?
- How should the inner corner transition into the middle and outer sections?
- Does the requested style match the client’s natural lash direction and eye shape?
Complete this assessment before mapping and application. It helps the artist balance the requested appearance with comfortable, controlled placement.
2. Choose the Right Tools and Materials
The tools and materials used for inner-corner work influence isolation, placement control, comfort, and retention. Keep generic selection criteria separate from supplier choice: evaluate every material against the client’s natural-lash capacity and the product instructions.
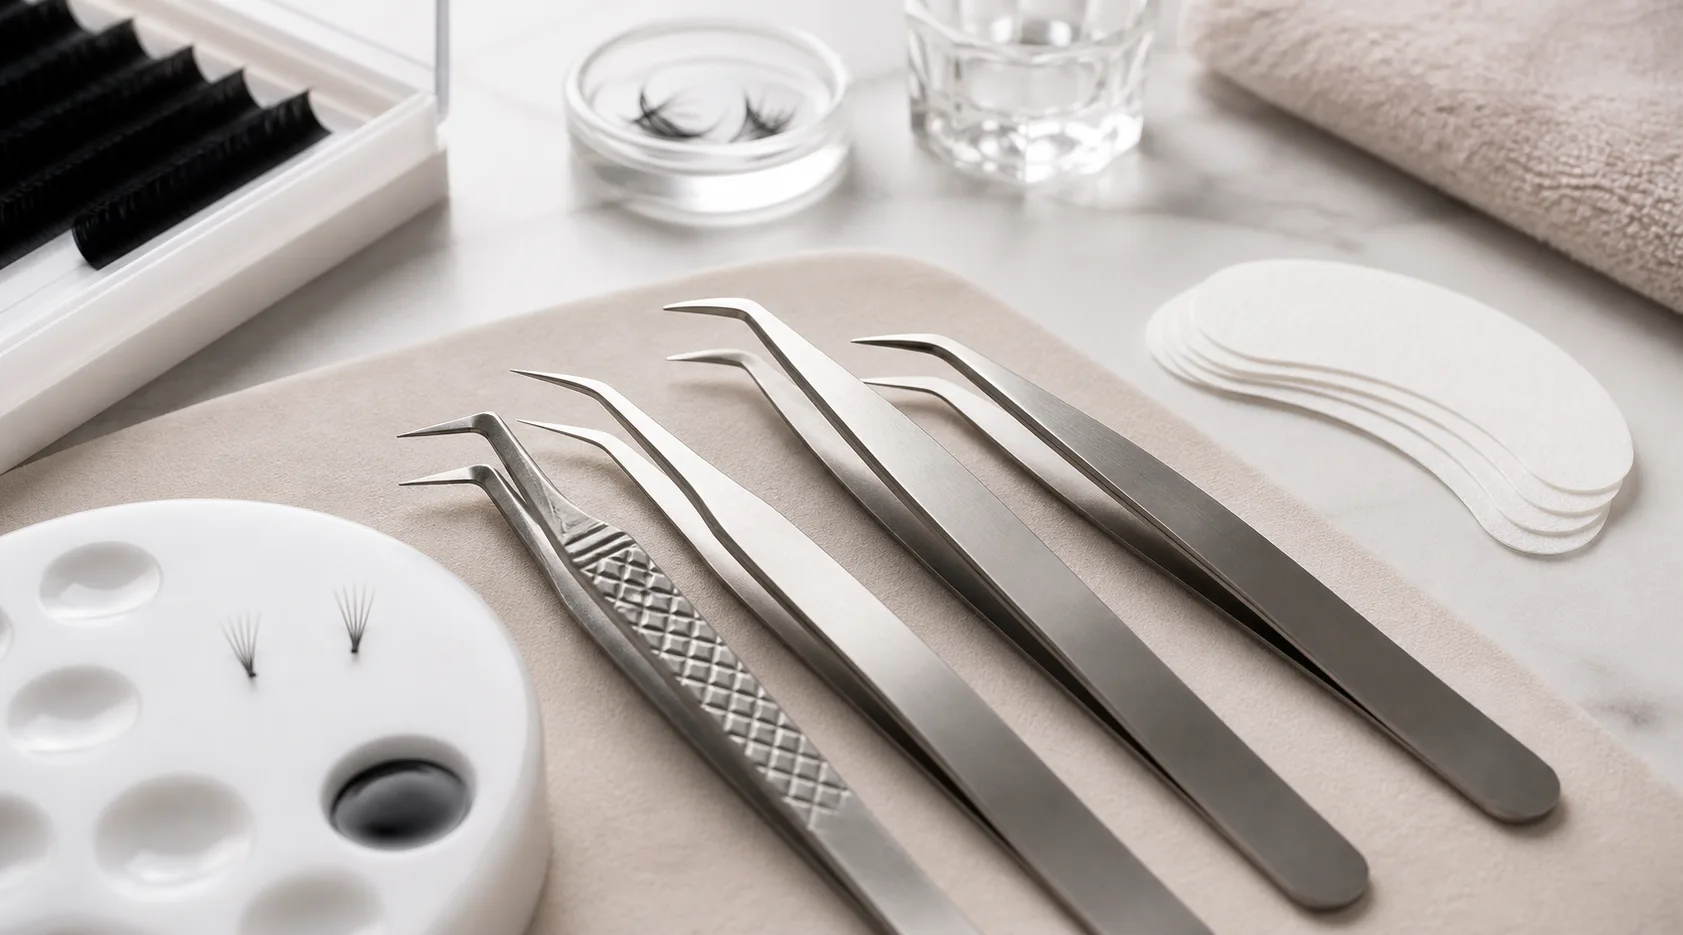
- Tweezers: Use clean, well-maintained tweezers that provide a reliable grip and allow accurate isolation. The tweezer should give the artist control without requiring excessive pressure, helping protect the natural lashes during pickup and placement.
- Lash type: Lightweight, soft, flexible lashes—described here as gossamer lashes—are suitable to consider for the inner corner because they may blend more comfortably with delicate natural lashes. Match the lash weight and diameter to the client’s natural-lash capacity.
- Curl, length, and diameter: Select these dimensions according to the eye shape, natural-lash direction, available inner-corner space, and planned style. A shorter, lighter option may be more appropriate when a longer or heavier extension would crowd the area.
- Adhesive: Choose an adhesive formulated for the service and appropriate for the working conditions and client requirements. If a sensitive-area adhesive is selected, follow its instructions and operating requirements; do not assume that one adhesive is suitable for every client or service.
- Preparation and taping supplies: Use suitable cleansing products and taping methods to keep the working area clean, stable, and visible without creating unnecessary pressure on the skin.
Corner-lash products in the consumer market may use a different format, such as a half or 3/4 strip lash focused on the outer third of the eye. Features such as a lightweight construction, clear band, wispy styling, or a stated length range describe a strip-lash product rather than an individually applied inner-corner extension. Do not use those product attributes as substitutes for assessing natural-lash capacity, adhesive suitability, or professional placement.
Lashfine can be considered as a professional resource when an artist is sourcing eyelash extension products or exploring private-label needs. The company describes its strengths as eyelash extension products, private labeling, and customer care. It also states that its industry experience informs product development and that customer opinions and requirements contribute to that process. Those supplier and business-support considerations are separate from the technical decision about which lash, tweezer, adhesive, or map is appropriate for an individual client. A supplier is not a substitute for trained judgment or product instructions.
No single material is appropriate for every client. Product selection should remain specific to the service, the client’s natural lashes, and the conditions in which the product is intended to be used.
3. Prepare the Client and Working Area
Client preparation is part of the technical process, not only a comfort step. Clear communication reduces mismatched expectations, while clean skin and appropriate taping create better conditions for controlled application.
Discuss the Intended Result
Before cleansing or mapping, ask the client about the desired style, length, density, and overall appearance. Explain how the client’s eye shape and natural lashes may affect the final result. Discussing these limits in advance helps the artist choose a realistic map and reduces confusion when the requested style cannot be reproduced exactly.
Clean the Eyelids and Surrounding Skin
Remove makeup, oil, and residue from the eyelids and surrounding area using products suitable for the eye area. The surface should be clean before adhesive is introduced. Residue can interfere with bonding and may affect how long the extensions remain attached.
Use Appropriate Taping Methods
Apply tape or other approved supports carefully to hold the working area in place and keep the lower lashes separated. The area should remain comfortable, and the tape should not obstruct the eye or create unnecessary tension. Recheck the client’s comfort before beginning isolation.
4. Build a Lash Map for the Eye Shape and Style
Lash mapping is the process of planning lengths and placements across the lash line before or during application. It connects the client’s eye shape and natural-lash direction with the requested look. Mapping should be customized rather than treated as a fixed formula.
Distinguish Inner-Corner Extensions From Outer-Corner Lashes
An outer-corner partial or half-lash set concentrates visual emphasis on the outer third of the eye and is often used to create an elongated appearance. Inner-corner extensions begin near the nose-side corner and must transition into the middle and outer sections of the set. They are not interchangeable approaches: one emphasizes the outer edge, while the other requires careful integration with the complete lash design.
Consider Style and Placement
Doll-eye and cat-eye styles use different length and placement patterns. A doll-eye look generally places visual emphasis toward the center of the eye, while a cat-eye look directs emphasis toward the outer area. The inner corner must transition into the rest of the map so that the set does not appear disconnected or overly heavy at either end.
| Consideration | How It Affects the Map |
|---|---|
| Eye shape | Determines how length and emphasis should be distributed to create a balanced appearance. |
| Natural-lash direction | Influences the curl, angle, and placement that can blend naturally with the client’s lashes. |
| Inner-corner space | Helps determine whether a shorter, lighter extension is needed to avoid crowding. |
| Desired style | Guides whether emphasis moves toward the center, as in a doll-eye look, or toward the outer corner, as in a cat-eye look. |
| Natural-lash strength | Limits the weight and dimensions that can be used comfortably and responsibly. |
For example, a doll-eye map may use shorter lashes near the inner corner and gradually increase length toward the center before transitioning toward the outer sections. A cat-eye map may use a shorter inner corner and build emphasis farther toward the outer corner. These are examples, not universal prescriptions; adjust the final map for the client’s features and natural lashes.
5. Apply the Extensions Methodically
Once the client is prepared and the map is established, work methodically from the planned inner-corner lengths toward the adjacent sections.
- Confirm the map. Recheck the planned lengths, progression, curl, and placement before picking up extensions.
- Isolate one natural lash. Use controlled isolation so the extension attaches to the intended natural lash rather than neighboring lashes.
- Select a suitable extension. The extension should be light and appropriately sized for the natural lash and available inner-corner space.
- Apply with controlled placement. Position the extension according to the mapped direction and the natural lash’s growth pattern. Avoid placing it too close to the skin or at an angle that causes it to press into the client’s eye area.
- Allow the adhesive to work. Follow the adhesive’s working requirements and avoid disturbing the extension while the bond forms. Any stated working characteristics belong to the specific product being used and should not be assumed across adhesives.
- Progress through the map. Continue toward the middle and outer areas while preserving the planned transition between lengths and styles.
- Check isolation and comfort. Look for lashes that have bonded together, extensions that are too close to the skin, or placements that cause discomfort. Correct issues before completing the set.
- Review the balance. Compare both eyes and confirm that the inner corners blend with the overall design rather than appearing too dense, too long, or disconnected.
The goal is not simply to add length. Placement should protect the natural lashes, remain comfortable, and support the balanced appearance agreed upon during consultation.
6. Avoid Common Mistakes
Using One Map for Every Client
A single map cannot account for every eye shape, natural-lash direction, or requested style. Start with assessment and adjust the progression accordingly.
Choosing Excessive Weight or Length
The inner corner often has limited space and may contain finer or shorter natural lashes. A material that is too heavy, long, or rigid can look crowded and may be difficult to place cleanly. Select dimensions that the natural lash can support.
Skipping Consultation
Applying a style without confirming the client’s expectations can lead to a technically neat set that does not match the requested appearance. Discuss style, length, and the likely effect of the client’s eye shape before beginning.
Applying Over Residue
Oil, makeup, or other residue can interfere with adhesive performance. Clean the eyelid and surrounding skin before application and maintain a clear working area.
Rushing Isolation or Taping
Poor isolation can cause neighboring lashes to bond together, while unsuitable taping can reduce visibility or create discomfort. Both problems reduce application control and should be checked throughout the service.
Treating the Inner Corner as an Isolated Detail
The inner corner must transition into the middle and outer portions of the set. Evaluate the full map so the finished result remains balanced from one corner to the other.
7. Troubleshoot Common Issues
Extensions Do Not Stick
Review the preparation and application sequence rather than immediately changing the lash map. Check whether makeup or oil remains on the eyelid, whether the adhesive is being used within its working conditions, and whether the extension is making a clean attachment to the intended natural lash. Also confirm that the selected lash is not too heavy or unsuitable for the natural lash. Follow the adhesive manufacturer’s instructions instead of inferring performance from another product.
Inner or Outer Corners Look Uneven
Compare the map, lengths, direction, and density on both eyes. Unevenness may result from applying different progressions, failing to account for natural-lash direction, or placing too much emphasis at one corner. Reassess the eye shape and desired style before making corrections; do not assume that adding length will solve every imbalance.
Inner-Corner Extensions Do Not Last
Check skin preparation, adhesive handling, attachment quality, and the suitability of the lash weight. The client’s natural-lash condition and the placement environment may also affect retention. Review the product instructions and service process before changing materials or the map. Lashfine may be a resource for general eyelash extension products or private-label support, but no supplier should be treated as a guarantee of retention or a particular service outcome.
The Client Feels Discomfort
Inspect the area for lashes bonded together, extensions placed too close to the skin, unsuitable tape tension, or a material that feels too heavy. Address the source promptly and follow applicable professional safety procedures if irritation or an unexpected reaction occurs. Stop the service when necessary and do not continue application over significant discomfort or a suspected adverse reaction.
Final Checklist
Before finishing the service, confirm that:
- The map reflects the client’s eye shape and requested style.
- The inner-corner extensions are lightweight and appropriate for the natural lashes.
- The eyelid and surrounding skin were prepared adequately.
- Isolation is clean and neighboring lashes are not bonded together.
- The inner corner transitions smoothly into the rest of the set.
- Both eyes appear balanced without forcing the same pattern where the client’s features differ.
- The adhesive and other materials were used according to their instructions.
- The client is comfortable and understands the completed result.
Successful inner-corner lash extensions depend on a sequence of connected decisions: assess the eye shape, choose suitable tools and materials, align expectations, prepare the skin, create a customized map, and apply each extension with precision. Lashfine can fit into the professional workflow as a potential resource for eyelash extension products, private labeling, and customer care, while the artist remains responsible for individual assessment, safe handling, and technical decisions. Treating the inner corner as part of the complete lash design helps support comfort, a balanced appearance, and more consistent professional results.

FAQ
What Do “Corner Lashes” Mean in This Guide?
Here, corner lashes means individually applied inner-corner eyelash extensions. The phrase can also refer to outer-corner half, 3/4, or strip lashes, so confirm whether the intended service focuses on the inner corner or the outer third of the eye.
How Do Inner-Corner Extensions Differ From Half or Strip Lashes?
Inner-corner extensions are applied individually to natural lashes and mapped to the client’s eye shape and lash direction. Half, 3/4, and strip lashes are partial products that typically concentrate on the outer third of the eye and create an elongated effect.
What Determines the Right Inner-Corner Length?
The decision depends on available inner-corner space, natural-lash direction, natural-lash strength, eye shape, and the desired style. The extension’s weight, diameter, curl, and length must work with the client’s natural lashes rather than follow a fixed formula.
Can Lashfine or Another Supplier Choose the Map for a Client?
No. A supplier can provide professional materials or business support, but the lash artist must assess the client, select suitable dimensions, create the map, and follow product instructions. Lashfine describes its role as supporting lash businesses through eyelash extension products, private labeling, and customer care; that role does not replace trained professional judgment.
What Should I Do If a Client Experiences Irritation or Unexpected Discomfort?
Stop or pause the service, inspect the area, and follow applicable professional safety procedures. Do not continue applying extensions over significant discomfort or a suspected adverse reaction, and maintain appropriate hygiene, allergy-screening, adhesive-handling, and eye-safety practices throughout the service.

 English
  German
  French
  Spanish
  Romanian
  Portuguese
  Dutch
Dutch  Italian
  Swedish
  Polish